
2. Getting started
This chapter provides a basic overview of how to program, compile, link, and execute a constraint model in Gecode. The chapter restricts itself to the fundamental concepts available in Gecode, the following chapter presents functionality that makes programming models more comfortable.
Overview. A first Gecode model explains the basics of how a model is programmed in Gecode. This is followed in Searching for solutions by a discussion of how search is used to find solutions of a model. How a model is compiled, linked, and executed is explained for several different operating systems in Compiling, linking, and executing. Using Gist shows how Gist as a graphical and interactive search tool can be used for developing constraint models. Search for a best solution of a model is explained in Best solution search.
The chapter also includes an explanation of how to obtain and build the Gecode source release in Obtaining Gecode. That section is worth reading before compiling the examples by hand, as it gives the version and build layout assumed here.
2.1. A first Gecode model
Models in Gecode are implemented using spaces. A space is home to the variables, propagators (implementations of constraints), branchers (implementations of branchings, describing the search tree’s shape, also known as labelings), and – possibly – an order determining a best solution during search.
Not surprisingly in an object-oriented language such as C++, an elegant approach to programming a model is by inheritance: a model inherits from the class Space (implementing spaces) and the subclass constructor implements the model. In addition to the constructor, a model must implement a copy constructor and a copy function such that search for that model works (to be discussed later).
Send More Money. The model we choose as an example is Send More Money: find distinct digits for the letters \(S\), \(E\), \(N\), \(D\), \(M\), \(O\), \(R\), and \(Y\) such that the well-formed equation (no leading zeros) \(SEND+MORE=MONEY\) holds.
#include <gecode/int.hh>
#include <gecode/search.hh>

using namespace Gecode;

class SendMoreMoney : public Space {
protected:
  IntVarArray l;
public:
  SendMoreMoney(void) : l(*this, 8, 0, 9) {
    IntVar s(l[0]), e(l[1]), n(l[2]), d(l[3]),
           m(l[4]), o(l[5]), r(l[6]), y(l[7]);
    // [send more money:no leading zeros]
    // [send more money:all letters distinct]
    // [send more money:linear equation]
    // [send more money:post branching]
  }
  // [send more money:search support]
  // [send more money:print solution]
};

// [send more money:main function]
The program (with some parts yet to be presented) is shown in Program 2.1. Note that clicking a blue line starting with \(\blacktriangleright\) jumps to the corresponding code. Clicking [download] in the upper right corner of the program provides access to the complete program text.
The program starts by including the relevant Gecode headers. To use integer variables and constraints, it includes <gecode/int.hh> and to access search engines it includes <gecode/search.hh>. All Gecode functionality is in the scope of the namespace Gecode, for convenience the program makes all functionality of the Gecode namespace visible by using namespace Gecode.
As discussed, the model is implemented as the class SendMoreMoney inheriting from the class Space. It declares an array l of integer variables and initializes this array to have 8 newly created integer variables as elements, where each variable in the array can take values from 0 to 9. Note that the constructor for the variable array l takes the current space (that is, *this) as first argument. This is very common: any function that depends on a space takes the current space as argument (called home space) Examples are constructors for variables and variable arrays, functions that post constraints, and functions that post branchings.
To simplify the posting of constraints, the constructor defines a variable of type IntVar for each letter. Note the difference between creating a new integer variable (as done with creating the array of integer variables together with creating a new integer variable for each array element) and referring to the same integer variable through different C++ variables of type IntVar. This difference is discussed in more detail in Integer and Boolean variables.
Posting constraints. For each constraint there is a constraint post function that creates propagators implementing the constraint (in the home space that is passed as argument).
The first constraints to be posted enforce that the equation is well formed in that it has no leading zeros:
    rel(*this, s, IRT_NQ, 0);
    rel(*this, m, IRT_NQ, 0);
The family of rel post functions (functions with name rel overloaded with different argument types) implements simple relation constraints such as equality, inequalities, and disequality (see Simple relation constraints over integer variables and Simple relation constraints over integer variables). The constant IRT_NQ requests a disequality constraint.
All letters are constrained to take pairwise distinct values by posting a distinct constraint (also known as alldifferent constraint):
distinct(*this, l);
See Distinct constraints and Distinct constraints for more information on the distinct constraint.
The constraint that \(SEND+MORE=MONEY\) is posted as a linear equation where the individual letters are scaled to their appropriate decimal positions:
    IntArgs c(4+4+5); IntVarArgs x(4+4+5);
    c[0]=1000; c[1]=100; c[2]=10; c[3]=1;
    x[0]=s;    x[1]=e;   x[2]=n;  x[3]=d;
    c[4]=1000; c[5]=100; c[6]=10; c[7]=1;
    x[4]=m;    x[5]=o;   x[6]=r;  x[7]=e;
    c[8]=-10000; c[9]=-1000; c[10]=-100; c[11]=-10; c[12]=-1;
    x[8]=m;      x[9]=o;     x[10]=n;    x[11]=e;   x[12]=y;
    linear(*this, c, x, IRT_EQ, 0);
The linear constraint (which, again, exists in many overloaded variants) posts the linear equation (as instructed by IRT_EQ)
with coefficients c, integer variables x, and right-hand side constant \(0\) (see Linear constraints and Linear constraints over integer variables). Here, \(|\mathtt c|\) denotes the size (the number of elements) of the array c (which can be computed by c.size()). Post functions are designed to be as general as possible, hence the variant of linear that takes an array of coefficients and an array of integer variables as arguments. Other variants of linear exist that do not take coefficients (all coefficients are one) or accept an integer variable as the right-hand side instead of an integer constant.
Note that the linear equation could have been expressed simpler by using standard initializer lists as in:
IntArgs c({         1000,  100,  10,  1,
                    1000,  100,  10,  1,
           -10000, -1000, -100, -10, -1});
IntVarArgs x({         s,    e,   n,  d,
                       m,    o,   r,  e,
                 m,    o,    n,   e,  y});
Posting linear constraints de-mystified demonstrates additional support for posting linear expressions constructed from the usual arithmetic operators such as +, -, and *.
Posting branchings. Branchings determine the shape of the search tree. Common branchings take a variable array of the variables to be assigned values during search, a variable selection strategy, and a value selection strategy.
Here, we select the variable with a smallest domain size first (INT_VAR_SIZE_MIN()) and assign the smallest value of the selected variable first (INT_VAL_MIN()):
branch(*this, l, INT_VAR_SIZE_MIN(), INT_VAL_MIN());
A branching is implemented by a brancher (like a constraint is implemented by a propagator). A brancher creates a number of choices where each choice is defined by a number of alternatives. For example, the brancher posted above will create as many choices as needed to assign all variables in the integer variable array l. Each of the choices is based on the variable selected by the brancher, say \(x\), and the value selected by the brancher, say \(n\). Then the alternatives of a choice are \(x=n\) and \(x\neq n\) and are tried by search in that order.
A space can have several branchers, where the brancher that is posted first is also used first for search. More information on branchings can be found in Branching.
Search support. As mentioned before, a space must implement an additional copy() function that is capable of returning a fresh copy during search. Search in Gecode is based on a hybrid of recomputation and cloning (see Search). Cloning during search relies on the capability of a space to create a copy of itself.
To avoid confusion, by cloning we refer to the entire process of creating a clone of a space. By copying, we refer to the creation of a copy of a particular object during cloning, for example, a variable or a space.
  SendMoreMoney(SendMoreMoney& s) : Space(s) {
    l.update(*this, s.l);
  }
  virtual Space* copy(void) {
    return new SendMoreMoney(*this);
  }
The actual copy() function is straightforward and uses an additional copy constructor. The copy() function is virtual such that cloning (used on behalf of a search engine) can create a copy of a space even though the space’s exact subclass is not known to cloning.
The obligation of the copy constructor is to invoke the copy constructor of the parent class, and to copy all data structures that contain variables. For SendMoreMoney this amounts to invoking Space(s) and updating the variable array. An exception of type SpaceNotCloned is thrown if the copy constructor of the Space class is not invoked. Please keep in mind that the copy constructor is run on the copy being created and is passed the space that needs to be copied as argument. Hence, updating the variable array l in the copy copies the array s.l from the space s being cloned (including all variables contained in the array). More on updating variables and variable arrays can be found in Updating variables.
Printing solutions. Finally, the following prints the variable array l:
  void print(void) const {
    std::cout << l << std::endl;
  }
In a real application, one would use the solution in some other parts of the program. The point is that the space acts as a closure for the solution variables: the space maps member names to objects. The space for an actual solution is typically different from the space created initially. This is due to the fact that search for a solution returns a space that has been obtained by constraint propagation and cloning. The space members that refer to the solution variables (the member l in our example) provide the means to access a solution independent of a particular space.
2.2. Searching for solutions
Let us assume that we want to search for all solutions and that search is controlled by the main function of our program. Search consists of two parts:
create a model and a search engine for that model; and
use the search engine to find all solutions.
Hence, our main function looks as follows:
int main(int argc, char* argv[]) {
  // [send more money:create model and search engine]
  // [send more money:search and print all solutions]
  return 0;
}
Creating a model is almost obvious: create an object of the subclass of Space that implements the model. Then, create a search engine (we will be using a search engine DFS for depth-first search) and initialize it with a model. Search engines are generic with respect to the type of model, implemented as a template in C++. Hence, we use a search engine of type DFS<SendMoreMoney> for the model SendMoreMoney.
When the engine is initialized, it takes a clone of the model passed to it (m in our example). As the engine takes a clone, several engines can be used without recreating the model. As we are interested in a single engine, we immediately delete the model m after the search engine has been initialized.
  SendMoreMoney* m = new SendMoreMoney;
  DFS<SendMoreMoney> e(m);
  delete m;
A search engine first performs constraint propagation as only spaces that have been propagated can be cloned (so as to not duplicate propagation for the original and for the clone).
The DFS<SendMoreMoney> search engine has a simple interface: the engine features a next() function that returns the next solution or NULL if no more solutions exist. As we are interested in all solutions, a while loop iterates over all solutions that are found by the search engine:
  while (SendMoreMoney* s = e.next()) {
    s->print(); delete s;
  }
As you can see, a solution is nothing but a model again. A search engine ensures that constraint propagation is performed and that all variables are assigned as described by the branching(s) of the model passed to the search engine. When a search engine returns a model, the responsibility to delete the solution model is with the client of the search engine.
It is straightforward to see how one would search for a single solution instead: replace while by if. DFS is but one search engine and the behavior of a search engine can be configured (for example: how cloning or recomputation is used; how search can be interrupted) and it can be queried for statistical information. Search engines are discussed in more detail in Search.
2.3. Compiling, linking, and executing
This section assumes that you have built or installed the Gecode version used by this document, namely Gecode 6.4.0. It is a source release, so the usual path is to build Gecode locally and either use it directly from its build tree or install it into a prefix. If you have not done that yet, read Obtaining Gecode first.
The most convenient way to use an installed Gecode from a new project is through CMake. A minimal CMakeLists.txt for the send-more-money.cpp example is:
cmake_minimum_required(VERSION 3.21)
project(send_more_money LANGUAGES CXX)
find_package(Gecode CONFIG REQUIRED)
add_executable(send-more-money send-more-money.cpp)
target_link_libraries(send-more-money PRIVATE Gecode::gecode)
If Gecode has been installed in a non-standard prefix, point CMake to that prefix:
cmake -S . -B build -DCMAKE_PREFIX_PATH=<dir>
cmake --build build --config Release
The remaining sections show the underlying compiler and linker settings. They are useful when a small example is compiled by hand or when an existing project does not use CMake.
2.3.1. Microsoft Visual Studio
For Visual Studio, the recommended route is to configure Gecode and the application with CMake. Visual Studio is a multi-configuration generator, so the configuration name is supplied when building:
cmake -S . -B build -G "Visual Studio 17 2022" -A x64
cmake --build build --config Release
cmake --install build --config Release --prefix C:\gecode
For an application using the installed tree:
cmake -S . -B build -G "Visual Studio 17 2022" -A x64 \
  -DGecode_ROOT=C:\gecode
cmake --build build --config Release
Commandline. In the following we assume that you use the Visual Studio Command Prompt. When compiling and linking with cl, you have to take the following into account:
As Gecode uses exceptions, you have to add
/EHscas option on the commandline.You have to link dynamically against multithreaded libraries. That is, you have to add to the commandline either
/MD(release build) or/MDd(debug build).If you want a release build, you need to switch off assertions by defining
/DNDEBUG.You should instruct the compiler
clto search for the Gecode header files by adding/I"<dir>\include"as an option.When using
clfor linking, you should add at the very end of the commandline:/link /LIBPATH:"<dir>\lib".By default,
clwarns ifthisis used in an initializer list (Gecode uses this for the initialization of variables and variable arrays). You can suppress the warning by passing/wd4355.
The full command for compiling send-more-money.cpp as a release build (including optimization with /Ox) is
cl /DNDEBUG /EHsc /MD /Ox /wd4355 -I"<dir>\include" \
  -c -Fosend-more-money.obj -Tpsend-more-money.cpp
where the \(\backslash\) at the end of a line means that the line actually continues on the next line. The following command links the program:
cl /DNDEBUG /EHsc /MD /Ox /wd4355 -I"<dir>\include" \
  -Fesend-more-money.exe send-more-money.obj \
  /link /LIBPATH:"<dir>\lib"
Integrated development environment. When your Microsoft Visual Studio solution uses Gecode, all necessary settings can be configured in the properties dialog of your solution. We assume that Gecode is installed in "<dir>".
You must use dynamic linking against a multithreaded library. That is, either
/MD(release build) or/MDd(debug build). Depending on whether/MDor/MDdis used, release or debug libraries and DLLs will be used automatically.As Gecode uses exceptions, you have to enable
/EHscas option (this is true by default).If you want a release build, you have to switch off assertions by defining
/DNDEBUG(this is true by default).Configuration Properties, C++, General: set the “Additional Include Directories” to include
"<dir>\include"as the directory containing the Gecode header files.Configuration Properties, Linker, General: set the “Additional Library Directories” to
"<dir>\lib"as the path containing the libraries.
2.3.2. Apple Mac OS
On Mac OS, build Gecode from the source release with CMake and install it into a prefix such as /opt/gecode or /usr/local. Xcode or the Xcode command line tools provide the compiler.
Commandline. When compiling your code using the gcc compiler (invoking it as g++), add the include and library directories for the prefix where Gecode has been installed.
The following command compiles and links send-more-money.cpp as a release build (including optimization):
g++ -std=c++17 -I<dir>/include -O3 -c send-more-money.cpp
g++ -std=c++17 -o send-more-money send-more-money.o \
  -L<dir>/lib -lgecodesearch -lgecodeint \
  -lgecodekernel -lgecodesupport
Xcode. Xcode projects should normally be generated or configured through CMake. If you manage an Xcode project by hand, add <dir>/include to the header search paths, <dir>/lib to the library search paths, and link the Gecode libraries used by the program.
2.3.3. Linux and relatives
On Linux and similar operating systems, Gecode is installed as a set of libraries and headers. The default installation prefix is "/usr/local", but a source build can be installed anywhere. For now, assume that Gecode is installed in "<dir>".
Commandline. To compile your code using the gcc compiler, you have to add the option -I<dir>/include so that gcc can find the header files.
For linking, the path has to be given as -L<dir>/lib, and in addition the individual Gecode libraries must be linked. You always have to link against the support and kernel libraries, using -lgecodesupport -lgecodekernel. For the remaining libraries, the rule of thumb is that if you include a header file <gecode/FOO.hh>, then -lgecodeFOO must be given as a linker option. For instance, if you use integer variables and include gecode/int.hh, you have to link using -lgecodeint.
Some linkers require the list of libraries to be sorted such that libraries appear before all libraries they depend on. In this case, use the following order (and omit libraries you don’t use):
-lgecodeflatzinc-lgecodedriver-lgecodegist-lgecodesearch,-lgecodeminimodel-lgecodeset-lgecodefloat-lgecodeint-lgecodekernel-lgecodesupport
A complete example for compiling and linking the file send-more-money.cpp is as follows.
g++ -I<dir>/include -c send-more-money.cpp
g++ -o send-more-money -L<dir>/lib send-more-money.o \
  -lgecodesearch -lgecodeint -lgecodekernel -lgecodesupport
The \(\backslash\) at the end of a line means that the line actually continues on the next line.
In order to run programs that are linked against Gecode, the Gecode libraries must be found on the library path. They either have to be installed in one of the default locations (such as /usr/lib), or the environment variable LD_LIBRARY_PATH has to be set to include <dir>/lib.
Eclipse development environment. If you use the Eclipse IDE with the CDT (C/C++ development tools), you have to configure the paths to the Gecode header files and libraries.
In the Project menu, select the Properties dialog. Under GCC C++ Compiler, add <dir>/include to the Directories. Under GCC C++ Linker, add <dir>/lib to the Library search path, and the Gecode libraries you have to link against to the Libraries field.
In order to run programs that link against Gecode from within the Eclipse CDT, select Open Run Dialog from the Run menu. Either add a new launch configuration, or modify your existing launch configuration. In the Environment tab, add the environment variable LD_LIBRARY_PATH=<dir>/lib.
2.4. Using Gist
#include <gecode/int.hh>
#include <gecode/gist.hh>

using namespace Gecode;

class SendMoreMoney : public Space {
...
};

int main(int argc, char* argv[]) {
  SendMoreMoney* m = new SendMoreMoney;
  Gist::dfs(m);
  delete m;
  return 0;
}
When developing a constraint model, the usual outcome of a first modeling attempt is that the model has no solutions or searching for a solution takes too much time to be feasible. What one really needs in these situations is additional insight as to: why does the model have no solutions, why is propagation not sufficient, or why is the branching not appropriate for the problem?
Gecode offers Gist as a graphical and interactive search tool with which you can explore any part of the search tree of a model step by step or automatically and inspect the nodes of the search tree.
Using Gist is absolutely straightforward. Program 2.2 shows how Gist is used for the Send More Money problem. As before, a space m for the model is created. This space is passed to Gist, where Gist is instructed to work in dfs (depth-first search) mode. The call to Gecode::dfs terminates only after Gist’s window is closed.
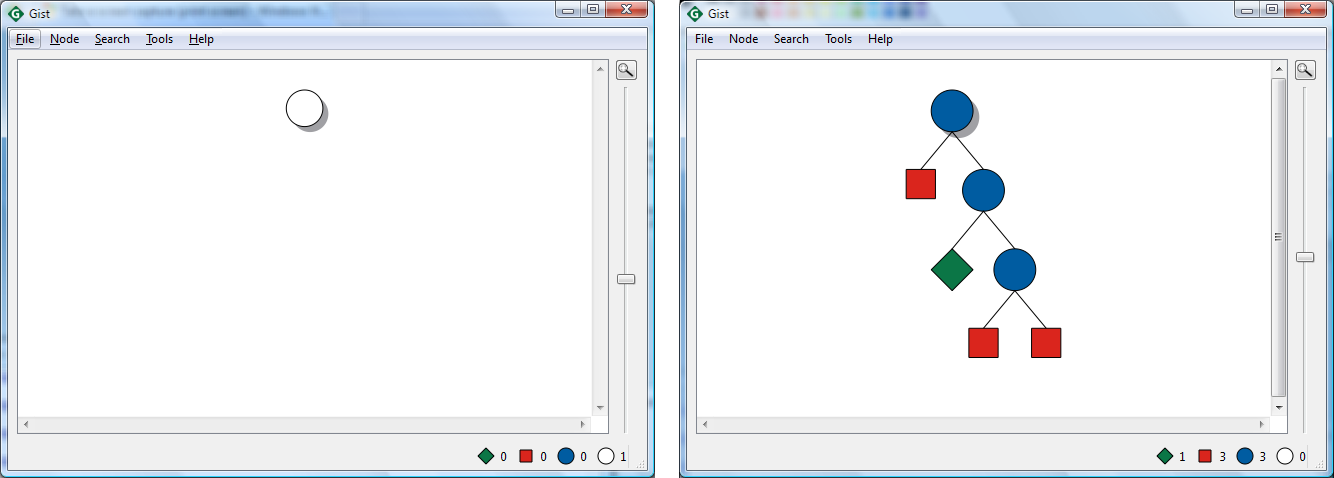
Figure 2.1 Gist screen shots
Figure 2.1 shows two screenshots of Gist. The left-hand side shows how Gist starts (with no node of the tree yet explored). The right-hand side shows the fully explored search tree of Send More Money.
Gist is so intuitive that our recommendation is to just play a little with it. If you want to know more about Gist, consult Gist.
#include <gecode/int.hh>
#include <gecode/gist.hh>

...
class SendMoreMoney : public Space {
...
  void print(std::ostream& os) const {
    os << l << std::endl;
  }
};

int main(int argc, char* argv[]) {
  SendMoreMoney* m = new SendMoreMoney;
  Gist::Print<SendMoreMoney> p("Print solution");
  Gist::Options o;
  o.inspect.click(&p);
  Gist::dfs(m,o);
  delete m;
  return 0;
}
One additional feature of Gist that comes in handy when developing constraint models is to inspect nodes of the search tree by double-clicking them. Program 2.3 shows a modified program that instructs Gist to use the print() function of SendMoreMoney whenever a node is double-clicked. Note that the print function has been changed to take a standard out-stream to print on as argument.
Using the script commandline driver explains how to use a commandline driver that supports to execute the same constraint model with different search engines (for example, DFS or Gist) by passing options on the commandline.
2.5. Best solution search
The last aspect to be discussed in this chapter is how to search for a best solution. We are using a model for Send Most Money as an example: find distinct digits for the letters \(S\), \(E\), \(N\), \(D\), \(M\), \(O\), \(T\), and \(Y\) such that the well-formed equation (no leading zeros) \(SEND+MOST=MONEY\) holds and that \(MONEY\) is maximal.
...
class SendMostMoney : public Space {
...
  // [send most money:constrain function]
};

// [send most money:main function]
Searching for a best solution requires a best solution search engine and a function that constrains a space to yield a better solution. A Gecode model for Send Most Money is shown in Program 2.4. The model differs from Send More Money only by using a different linear equation and the additional constrain() function.
Assume a new solution, say b, is found during best solution search: on the current search node s (a space) the member function constrain() is called and the so-far best solution b is passed as argument (that is, s.constrain(b) is executed). The constrain() member function must add a constraint to s such that s can only yield a better solution than b during search. For Send Most Money, the constrain() member function is as follows:
  virtual void constrain(const Space& _b) {
    const SendMostMoney& b = static_cast<const SendMostMoney&>(_b);
    IntVar e(l[1]), n(l[2]), m(l[4]), o(l[5]), y(l[7]);
    IntVar b_e(b.l[1]), b_n(b.l[2]), b_m(b.l[4]),
           b_o(b.l[5]), b_y(b.l[7]);
    int money = (10000*b_m.val()+1000*b_o.val()+100*b_n.val()+
                 10*b_e.val()+b_y.val());
    IntArgs c(5); IntVarArgs x(5);
    c[0]=10000; c[1]=1000; c[2]=100; c[3]=10; c[4]=1;
    x[0]=m;     x[1]=o;    x[2]=n;   x[3]=e;  x[4]=y;
    linear(*this, c, x, IRT_GR, money);
  }
First, the integer value of money in the so-far best solution is computed from the values of the variables. Note that the search engine does not know what model it searches a solution for. The search engine passes a space _b that the constrain member function must cast into a SendMostMoney space. Then the constraint is added that a better solution must yield more money.
Using a best solution search engine. The main function now uses a branch-and-bound search engine rather than a plain depth-first engine:
int main(int argc, char* argv[]) {
  SendMostMoney* m = new SendMostMoney;
  BAB<SendMostMoney> e(m);
  ...
}
The loop that iterates over all solutions found by the branch-and-bound search engine is exactly the same as before. That means that solutions are found and printed with an increasing value of \(MONEY\). The best solution is printed last.
The branch-and-bound engine BAB (see also Search engines) calls the constrain() member function defined by the model. Note that every space defines a default constrain() member function (to keep the design of models simple). If a model does not re-define the constrain() member function (either directly or indirectly bu inheriting a constrain() function), the default function will do nothing.
Using Gist for best solution search is straightforward. Instead of using Gist::dfs, one uses Gist::bab to put Gist into branch-and-bound mode.
In Using a cost function it is discussed how a simple cost() function can be used for best solution search instead of a more general constrain() function.
2.6. Obtaining Gecode
This section explains how to obtain Gecode. Gecode 6.4.0 is distributed as a source release. Some operating systems also provide Gecode packages, but those packages are maintained by the corresponding distribution and may not match the version used by this document. To get the version described here, download the source release and build it locally.
2.6.1. Installing Gecode
The source archive is available from the Gecode GitHub releases. Download the archive for Gecode 6.4.0 and unpack it into a working directory. The commands in the next section assume that the source directory is called gecode-6.4.0.
2.6.1.1. Installing Gecode on Windows
Install Visual Studio 2022 with the C++ toolchain and CMake. If you need MPFR support, using the source release with CMake and vcpkg is the most direct path.
2.6.1.2. Installing Gecode on Apple Mac OS
Install Xcode or the Xcode command line tools. CMake can then use the Apple compiler directly. Optional components require their own dependencies; Gist, for example, requires Qt.
2.6.1.3. Installing Gecode on Linux and relatives
The Debian and Ubuntu Linux distributions come with pre-compiled packages for Gecode. These packages (and all the packages they depend on) can be installed with the usual package management tools. These packages can be useful for quick experiments. They are not the Gecode 6.4.0 release, and they should not be used when exact version matching matters.
2.6.2. Compiling Gecode
Gecode can be built on recent versions of Windows, Linux, and Mac OS. The source code is available from the Gecode GitHub releases.
Prerequisites. In order to compile Gecode with the CMake build, you need CMake 3.21 or newer, a C++17-capable compiler, and uv on the search path. Optional modules have optional dependencies: MPFR for trigonometric and transcendental float constraints, and Qt5 or Qt6 for Gist.
We currently support:
Microsoft Visual C++ compilers for Windows. Microsoft Visual Studio Community is available free of charge from Microsoft.
GNU Compiler Collection (gcc) for Unix flavors such as Linux and Mac OS. The GNU gcc is open source software and available from the GCC home page. It is included in many Linux distributions.
The Apple compiler shipped with Xcode and the Xcode command line tools.
Configuring the sources. For a single-configuration generator such as Ninja or Unix Makefiles, configure a release build as follows:
cmake -S gecode-\GecodeVersion -B build \
  -DCMAKE_BUILD_TYPE=Release
For a multi-configuration generator such as Visual Studio or Xcode, omit CMAKE_BUILD_TYPE and choose the configuration when building:
cmake -S gecode-\GecodeVersion -B build
Compiling the sources. After configuration succeeds, build Gecode with:
cmake --build build --config Release
With single-configuration generators, the --config Release argument is harmless and may also be omitted.
Running the test suite. The CMake build defines a check target when tests are enabled:
cmake --build build --config Release --target check
Installation. After compilation succeeds, you can install the Gecode library and all header files necessary for compiling against it by invoking
cmake --install build --config Release --prefix <dir>
Running the examples. After compiling the examples, they can be run directly from the build tree. For instance, try the Golomb Rulers Problem:
./build/examples/golomb
or, when using a multi-configuration generator on Windows:
./build/examples/Release/golomb.exe
On some platforms, you may need to set environment variables like LD_LIBRARY_PATH (Linux) or DYLD_LIBRARY_PATH (Mac OS) to the toplevel compile directory or the installation directory (where the dynamic libraries are placed after compilation).
Compilation with Gist. The Gecode Interactive Search Tool (Gist) is a graphical search engine for Gecode, built on top of Qt. CMake looks for Qt5 or Qt6 when Gist is enabled. If Qt is not found, Gist is disabled automatically. To make this choice explicit, configure with:
cmake -S gecode-\GecodeVersion -B build -DGECODE_ENABLE_GIST=ON
Compilation with support for trigonometric and transcendental float constraints. Trigonometric and transcendental float constraints require MPFR (see also Transcendental and trigonometric functions and constraints). CMake searches for MPFR when float support with MPFR is enabled. Use CMAKE_PREFIX_PATH, MPFR_ROOT, or a toolchain file to point CMake to a non-standard MPFR installation.
2.6.3. Advanced configuration and compilation
If the instructions from the previous section do not work for your system, the following examples show common CMake options for configuring Gecode.
2.6.3.1. Example configurations
To compile only the Gecode library without examples, use
cmake -S gecode-\GecodeVersion -B build \
  -DGECODE_ENABLE_EXAMPLES=OFF
To compile using a different compiler and install under /opt/gecode, use
cmake -S gecode-\GecodeVersion -B build \
  -DCMAKE_C_COMPILER=gcc -DCMAKE_CXX_COMPILER=g++ \
  -DCMAKE_BUILD_TYPE=Release
cmake --build build
cmake --install build --prefix /opt/gecode
To compile a debug build, use
cmake -S gecode-\GecodeVersion -B build -DCMAKE_BUILD_TYPE=Debug
To disable an optional module, use the corresponding GECODE_ENABLE_… option. For example, to build without Gist:
cmake -S gecode-\GecodeVersion -B build -DGECODE_ENABLE_GIST=OFF
On Mac OS, universal binaries are configured through the standard CMake architecture setting:
cmake -S gecode-\GecodeVersion -B build \
  -DCMAKE_OSX_ARCHITECTURES="arm64;x86_64"
Disabling the default memory allocator. By default, Gecode uses a default memory allocator based on the C standard library functions malloc() and free(). This default allocator can be disabled by
cmake -S gecode-\GecodeVersion -B build \
  -DGECODE_ENABLE_ALLOCATOR=OFF
If the default allocator is disabled, one must supply the implementation of an allocator, this is explained in Using a different memory allocator..
Passing options for compilation. Additional options for compilation can be passed through the standard CMake compiler flags. For example:
cmake -S gecode-\GecodeVersion -B build \
  -DCMAKE_CXX_FLAGS="-mtune=native"
Compiling in a separate directory. The Gecode library should normally be built in a separate build directory. Assume that the sources can be found in directory $GSOURCEDIR. Configure the build directory with:
cmake -S $GSOURCEDIR -B build [options]
This keeps generated files out of the source tree.
Dependency management. CMake tracks source dependencies for normal builds. If you change the variable implementation specifications and want to regenerate the checked-in generated headers, configure with GECODE_REGENERATE_VARIMP=ON. This requires uv on the search path.
Compiling for unsupported platforms. For a platform not mentioned here, start with the closest native CMake generator and toolchain file for that platform. The CMake settings should describe the compiler, target system, SDK, and architecture.
2.6.3.2. Useful Makefile targets
The CMake build supports the following useful targets:
allcompiles the enabled parts of the library and the examples if examples are enabled.checkbuilds and runs the test suite when tests are enabled.installinstalls libraries, headers, tools, and CMake package files into the selected prefix.cleanremoves files generated by the current build configuration.